Posts

Showing posts from 2019

PC Shelf 'Case'

Image
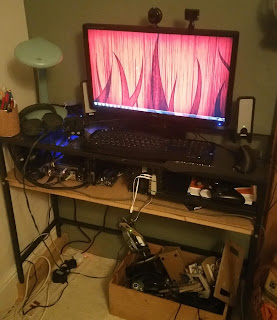
TLDR: I made a shelf for my desk and mounted my PC components on it.  Lookit! Having changed my PC desk a while ago, I've been growing gradually more annoyed at my tattered cardboard PC case sitting as an eye-sore in plain view of the whole living room.  The hard drives were hanging loose and the cooler radiator was balanced precariously on top. After much thought, I decided to add a shelf to my PC desk.  That way the PC could be off the floor, and the components could show through the glass desk-top.  Fixing a shelf to the metal box-section desk frame would not be easy, but I decided on drilling holes through the frame and bolting the shelf to it. Making the MDF shelf (with some battening to keep it rigid) was fairly easy.  Drilling the holes in the frame was a pain in the backside.  I should really invest in some proper drill bits for metal.  Eventually, after realising my M4 bolts were too short to fit through the wooden battens, I dug out some M6 bolts, widened the hol

Winforms WYSIWYG development on Ubuntu

...can it be that this is impossible without Windoze in a VM? Specifically for WYSIWYG dialog editor: Visual Studio Community runs like a dog in a VM.* Visual Studio Code doesn't appear to have one. Monodevelop only has a GTK# one** Jetbrains Rider is a 'cross platform' IDE but the WYSIWYG tool only works on Windoze . >_< SharpDevelop is built in .NET but for some reason uses Windoze-specific code . Is the only serious option to dual-boot with Win7/10?  SERIOUSLY? Who ever said that .NET is cross platform? Gromgromgrom. So I'm left going with a Win10 VM running on a ramdisk and a second virtual drive on HDD to hold the code.  Seeing as I want to commit and push the code straight back to source control, it shouldn't be a problem that the local copy of the code is trapped in a virtual disk. *it isn't _all_ that bad in qemu/kvm if you're running Win10 from a ramdisk, but make sure you get your syncing to HDD right or you could lose a lo

PC Controller Supports

Image
TLDR: I made a desk-like thing which attaches to the arms of my computer chair (see pictures below). Recently I changed my PC desk to take up less space in my living room.  The new desk is an IKEA metal/glass laptop desk.  Unfortunately it was about an inch too long to sit in the gap between my fire hearth, so I had to prop up the other side on bits of wood.  This made the desk too high for comfortable use of my cardboard steering wheel. So I designed and built a work-surface which attaches to my PC chair. The first step was to make some struts which sandwich the chair's arm rests.  They are secured with carriage bolts and wing-nuts/washers from Wilko. Then come the blocks with dowels which are screwed to the struts, and the work-surface which sits on the dowels. The surface is reversible and asymmetrical so my keyboard/mouse can sit close to me.. ...but my steering wheel can sit further away. As shoddy as it might look, I'm quite proud of that.  N

GRG16 - Now with keyboard input!

The original goal was to make a Mega-drive-like virtual games console which wouldn't have a keyboard.  After some thought, I realised that keyboard input might help me with both the teaching/learning goals (by giving scope for a wider variety of activities) and the development (by giving me easily testable incremental steps towards the final program). So now I have a keyboard device which populates two memory locations: one for the currently-depressed key, and a second for the current modifier state (CTRL, SHIFT, ALT). Plus, after much painful debugging, I have a program written for the VM in assembler which reads the key state and displays typed characters to the screen. This highlighted the need for development/debugging tools for the virtual console itself, and I am seriously daunted by the prospect of having to develop them. Also, I no longer like the BusController being in its own separate thread.  I've already had problems with the compiler optimising out rea

A Win7 VM on Linux!

It's been a while since I played around with qemu-kvm, but there's an app I have to use for work which only has a Windows installer. BOO! Setting up qemu on Linux was as simple as following these instructions: https://www.linuxtechi.com/install-configure-kvm-ubuntu-18-04-server/ Getting Windows 7 to install without taking a million years required the virtio drivers as described for Windows 10 here: http://bart.vanhauwaert.org/hints/installing-win10-on-KVM.html I then had problems with a seriously annoyingly jerky mouse pointer.  Searching around told me to add a USB tablet input device through virt-manager's VM setup.  That got that sorted. So, some hours of searching and progress bars later, I have a working Windows 7 VM with the work app installed!  Hoorah! Addendum: I did try to get Windows 10 to work in a VM first, but it was sooooooo sloooooooow it was unusable.  Once I've got a server with more RAM, I might try to set it up with a main disk image co

GRG16 Update

Image
Back in March, I posted an update talking about a bunch of stuff I would do. Nearly 5 months later, those things are pretty much done (with a couple of tweaks), and here is the jaw-dropping screenshot!!!! What do you mean, your jaw hasn't dropped? O_o Tbh, I can understand you being underwhelmed.  It is a singularly unimpressive screenshot, and the blank column on the right shows it doesn't even work properly. BUT! What the GRG-16 program is actually doing is loading and running a binary ROM file which contains the definition of the screen (set of character codes) AND assembler code to draw that definition to the screen. So behind the scenes, there are many moving parts.  There is an assembler which can take a text file and put together a binary ROM with instructions and data. Then there is the GRG-16 program itself, which has a CPU, ROM device, graphics device and a 'BusController' to copy data between them. At the minute, this is based on an SDL &

Sculpting: Control Panel

Image
I have been playing around for literally years trying to sculpt and cast miniatures / scenery bits.  I have been plagued by (amongst other things) silicone leaks, air bubbles and sheer clumsiness.  Today I have won a hard-fought victory against air bubbles! When putting resin into a silicone mold, air bubbles get trapped in all the hard-to-reach places.  I tried a few things to get rid of them: Pouring a little resin in, then 'rolling' it around the mold by tipping it all different directions.  It spilt some resin, and took up some of its valuable pot-life.  Results: poor (although it might work for larger models). Adding flow-channels to model/mold.  This involved cutting away channels of the mold, or adding sprue-like protrusions to the model itself when making the mold.  It was very hit-and-miss, with some larger models coming out great some of the time.  Air would still end up getting trapped though, and the channels meant extra resin to remove after the cast. Resul

2-Button Jam: Postmortem

Image
What? I participated in my first itch game jam and it was great fun.  I thought I'd write a postmortem for posterity and in case anybody might find it useful. The jam The game Art apps used: GIMP , Pinta , Tiled Sound apps used: Beepbox , Audacity Engine used: Godot How I came to the game jam I used to work as a game programmer and I've always harboured my dream of making my own games.  I'd been to my local game developer meetup , and we'd discussed itch game jams as a motivational tool.  When the Easter holidays came around (I'm a full-time teacher), I decided I would take the plunge.  I chose the 8-bits-to-infinity jam because the constraint of only using two buttons intrigued me. Initial ideas for the game With such a strong limitation as only having two buttons, I decided to start with the mechanics.  Having played Micro-Machines on the PSX back in the day, I remembered playing 4-player with only two controllers.  Each player had half a game

GRG16: Update

Progress on the GRG16! I decided the next project waypoint for me was going to be an emulator which loads a boot/BIOS rom which will display a 'No cart inserted' message on screen.  This seemed like a good target because it would mean integrating some kind of programming, defining graphics data and enough of the emulator machine itself to display it. So far, progress has been slow but steady.  I have implemented a rudimentary assembler in Python which can also include raw hex.  The current version can parse/assemble asm code and also extract pixels and/or palettes from images (using the Pillow Python library).  I'm sure there are plenty of bugs still to find in it, but the file it produces passes the quick-scan-in-a-hex-editor test. I've also made some progress on the emulator side.  In addition to the VPD I worked on previously, the CPU is pretty much implemented, and I've just implemented a BusController to move data between boot/BIOS rom, cartridge, RAM, et

GRG16: Mega-Drive-a-like

I was musing about the possibility of getting students to write console homebrew software.  I suspect students would find the prospect of running their own games on emulators (or perhaps even an actual software-hacked console) really inspiring and enjoyable. However, the technological difference between making homebrew software and downloading and running copyrighted ROMs is incredibly small.  So I suspect students' parents might be a bit suspicious or potentially even outright hostile to such a club. So I started to dig down to what the educational benefit of such a thing would be.  Potental benefits might include: understanding/using indexed-colour images, managing RAM and VRAM by hand, writing programs in assembler (or a subset of C), understanding specific technical limitations.  In short: lots of great scope for computational thinking and exposing technical systems as not-actually-magic. Pico-8 is amazing and YOU SHOULD BUY IT.  I love it and it is very close to what I