Posts

Showing posts with the label Miniatures

GW Weapon Masters and Wreckers

Image
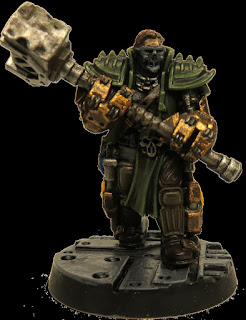
 I just finished the weapons masters from this GW Necromunda set .  I went with a slightly more colourful scheme than the GW artist did, but I still wanted them to look at least somewhat grimy.  With some of the photos I tried to take the white background out (you can see how lame I am at it), but I didn't bother with all of them.  The first one is the hammer guy.  I had trouble figuring out what his mask was meant to look like - I'm not too happy about that.  I am particularly happy with the hammer head - especially how it came out under the light.  I wanted it to look metallic but also dented and dirty.  I think I did a decent job of it.  The arms look much more gold-y in some of the photos and much more bronze-y in others.  The reality is that they are quite a browny-bronze.  I love the sculpt of them, with the believable exposed hinges. The second one is the cylinder-cartridge rifle guy.  I went with Mechrite Red for him, m...

Babylon 5 Starfury Model

Image
After two months, I have finally 'finished' the Starfury model. The painting is really untidy in places, and I really could not be bothered with the dozens of tiny water-slide transfers.  That said, I am still stamping this as DONE because it was getting really tedious towards the end. I love the Starfury design as a nod to Newtonian mechanics in sci-fi.  It is the most believable space fighter I've ever come across and I'm really glad I have finally got round to building this. The model design itself has many flaws.  Many of the pieces didn't fit snugly together, and the lower guns had to be literally chopped in half to get them stuck on.  They must have known of these flaws and just decided to ship it anyway.  After all, it's only fanboys like me that would buy it. I didn't have the right grey to paint it, so I mixed the colour from Vallejo's Cold Grey and some cheap white acrylic.  It's come out a little more blue than I wanted, but not badly eno...

Sculpting: Control Panel

Image
I have been playing around for literally years trying to sculpt and cast miniatures / scenery bits.  I have been plagued by (amongst other things) silicone leaks, air bubbles and sheer clumsiness.  Today I have won a hard-fought victory against air bubbles! When putting resin into a silicone mold, air bubbles get trapped in all the hard-to-reach places.  I tried a few things to get rid of them: Pouring a little resin in, then 'rolling' it around the mold by tipping it all different directions.  It spilt some resin, and took up some of its valuable pot-life.  Results: poor (although it might work for larger models). Adding flow-channels to model/mold.  This involved cutting away channels of the mold, or adding sprue-like protrusions to the model itself when making the mold.  It was very hit-and-miss, with some larger models coming out great some of the time.  Air would still end up getting trapped though, and the channels meant extra resin ...

Scratch Built Chimera-a-like

Image
I've been working for a billion years on building a 40K-Chimera-style APC.  It's meant for my own pet Imperial Guard regiment styled around salvaged and cannibalised equipment.  (Gods bless the flexibility of the Rogue-Trader-88 rules!) After much swearing and bleeding over plasticard, I managed to cobble together a shell and cover most of the flaws with Milliput.  And then the model sat, ready to be painted, for many weeks.  But this weekend, I finally got around to painting it! What's that?  You want to see shoddily-edited photos taken by a monkey with no appreciation for lighting?  I have just the thing! The true colours are somewhere between the top two pictures.  The photos also don't show quite how wonky the whole thing is.  I doubt there's a pair of parallel edges anywhere on it. For the rust I followed this tutorial .  For the rivets, I cut discs from some really thin plastic rod (thank you dakkadakka forums for th...

Mechanical November '18 : Power Turbine Part 1

Image
Over at Azazel's Bitz Box the November challenge is 'Mechanical' miniatures and scenery. I've been meaning to make some more 40K scenery for a while, and I've never taken part in a challenge like this before.  So today I spent a pleasant few hours working on a large power-turbine piece. So far it looks like this: It's quite messy, but the the core of it is there. The left end is meant to be a turbine driven by high pressure gas coming out from underground.  The idea is that this would drive a shaft in the central tube, which in turn drives the generator end (the right hand side). The plan is for it to have some access hatches, cooling radiators, rivets, and a couple of control consoles.  There's a lot of filling/tidying that's needed before then, but it's getting there. Here's some detail of the inflow pipe and exhaust vents. Yes, that is a (never used!) medical specimen tube. ...and the internal cardboard structure ...

New Scenery Blocks

Image
I'm continuing to build scenery in 12" square blocks to allow for depth in the terrain, and I've finished two more blocks: a corner bunker and another straight trench. The Corner Bunker The idea for this block was an objective, defensive position or entry point at the corner of the battlefield. The bunker itself is just cereal card glued to the underlying corrugated-cardboard frame.  I used a scalpel to cut the groove for where the door closes.  The paint is a simple mix of cheap black and white acrylic paint. The road edges coming in are meant to be tracks worn by long-term vehicle use.  I built up areas with a mix of bird-grit , bird-sand , talc , PVA and water.  Then I used sand-talc-PVA-water to smooth it a bit more, then finally talc-PVA-water to try and make some sections look muddier. The colouring is a dark brown spray , followed by a lighter stone-coloured spray , then dry brushed with cheap brown acrylic , blending up with white. ...

Modded Viper Jet Bike

Image
An addition to my scavenger Rogue Trader army is this modded Eldar Viper Jetbike. You don't get many Games Workshop things on Freecycle, but a couple of battered jetbikes and some Dark Eldar popped up and I nabbed them. Then I had to make it fit my scavenger militia.  So I ventured into the world of Milliput for the first time. I first attempted the cockpit without a wire armature, but that was brittle and extremely frustrating, so I cut it all off and worked it again with florists wire.  I have since bought modelling wire because the Milliput really did not like sticking to the plastic coating on the florists wire. The pilot is the original Eldar one with globs of putty to make him look a little more Cadian-like. The stippled rust was inspired by this forum post , but I still need heaps of practice. As the clear perspex stands were missing, I decided to attempt to make the bike 'sit' on its own dust cloud.  I glued two pieces of bent florists wire...

Rogue Trader Battle Report: Rabble vs. Salvage Marines

Image
When I finally realised that actually playing 40K was the worst part of 40K, I decided to just buy and paint miniatures that I liked the look of.  At the same time, my brother was really enjoying making new Space Marine vehicles out of lots of spare parts. In order to give these miniatures life, we decided to start playing Rogue Trader .  It involved making up all the stats and talking things through to make sure we weren't just min-maxing them all.  Plus, we had to make up some house rules to clarify things (and more will follow, I'm sure).  But after all that, we had our first battle: The Rabble vs. Salvage Marines. Salvage Marines (working title) are a lost chapter of Space Marines that get a lot of their equipment from finding old battlefields and strongholds, recovering and repairing all they need.  They have come to an ashen desert world in search of an abandoned Space Marine complex and found that the locals are far from friendly. The Rabble are t...

Armoured Bear!!!

Image
I have finished painting an armoured bear from Privateer Press' Hordes game. I sculpted the stream and rocks on the base (I cheated for a couple of the rocks and actually used fragments from my garden). I tried to get the gashes in his armour to look shiny as if the paint was scraped away.  I am somewhat pleased with the result, but it still looks a little untidy to me.  Not enough to bother redoing it, but there you go. And here he is!! He's got a scar going through his right eye so I tried to get a cataract look to it. The base.  Lots of Milliput fun.  And a scuff still to repair. :/

Bloodthirster pics

Image
It has taken me about two years to find the time to finish this miniature, but I am really pleased with the result. My photography/Gimp skills are fairly poor, but I've included pics if you'd like to see...