Posts

Showing posts from 2018

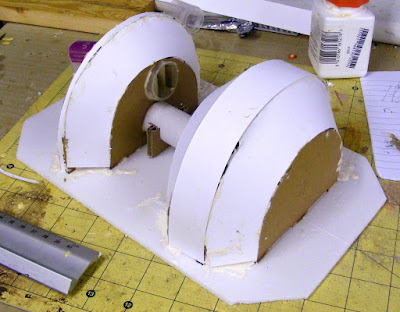
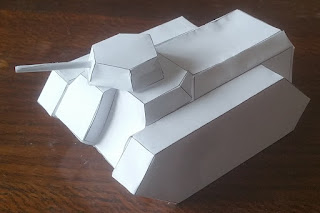
Cardboard Mock-up of USB Joystick

Image
For years now (literally years ), I have been playing around with the idea of making a USB joystick.  You may have seen my previous experiment in building a throttle control . I wanted to use a similar idea to the throttle, taking the angular motion of the handle and magnify it when applying it to the potentiometer.  e.g. move the handle through 45 degrees and the potentiometer gets moved through 90 degrees. I also wanted it anchored at the rear, so I can build a mount to attach it to my computer chair. In the video you can see a cardboard mock-up I made today.  I'm amazed it worked at all, but it even provides a solid foundation for designing the proper plywood one. The process of making a cardboard mock-up was really useful.  There were three fatal flaws in my sketch design which I would not have found out until I tried to make it: Pushing the joystick left/right when it was already pulled full back makes it catch on the rear support. The internal supports in the

Scratch Built Chimera-a-like

Image
I've been working for a billion years on building a 40K-Chimera-style APC.  It's meant for my own pet Imperial Guard regiment styled around salvaged and cannibalised equipment.  (Gods bless the flexibility of the Rogue-Trader-88 rules!) After much swearing and bleeding over plasticard, I managed to cobble together a shell and cover most of the flaws with Milliput.  And then the model sat, ready to be painted, for many weeks.  But this weekend, I finally got around to painting it! What's that?  You want to see shoddily-edited photos taken by a monkey with no appreciation for lighting?  I have just the thing! The true colours are somewhere between the top two pictures.  The photos also don't show quite how wonky the whole thing is.  I doubt there's a pair of parallel edges anywhere on it. For the rust I followed this tutorial .  For the rivets, I cut discs from some really thin plastic rod (thank you dakkadakka forums for that idea). The bits I a

SVG to Animated Sprite Experiment

Image
This is more of a record for myself rather than a usual blog post, but I've been working hard to develop an art pipeline where I can avoid having to draw a gazillion sprite frames without going full shadow-puppet like Spriter . Today's result is rubbish: ...but y'know, it's more of a proof-of-concept than an actual art attempt. The idea is simple:   Draw a simple SVG image with multiple components Import into Blender, assemble components and animate Render animation from Blender into sprite page ready for 2D game. Of course, the implementation is far from simple. First off, Blender imports the SVG outlines as curves, not meshes.  So in object mode , you have to select the curve, press Alt-C , then select Mesh from Curve/Meta/Surf/Text . That makes the outline into a bunch of lines.  In edit mode , select all the vertices and press F to make it a face.  Then, optionally Triangulate Mesh . Position, scale, rotate the components as required (alt

Mechanical November '18 : Power Turbine Part 1

Image
Over at Azazel's Bitz Box the November challenge is 'Mechanical' miniatures and scenery. I've been meaning to make some more 40K scenery for a while, and I've never taken part in a challenge like this before.  So today I spent a pleasant few hours working on a large power-turbine piece. So far it looks like this: It's quite messy, but the the core of it is there. The left end is meant to be a turbine driven by high pressure gas coming out from underground.  The idea is that this would drive a shaft in the central tube, which in turn drives the generator end (the right hand side). The plan is for it to have some access hatches, cooling radiators, rivets, and a couple of control consoles.  There's a lot of filling/tidying that's needed before then, but it's getting there. Here's some detail of the inflow pipe and exhaust vents. Yes, that is a (never used!) medical specimen tube. ...and the internal cardboard structure

Affinity Designer Free Trial

Image
I am not an artist. I enjoy playing around painting miniatures and I bumble along creating some functional 3D models and 2D art for my play programming projects. Using Inkscape and Gimp (because they are free-free), and Paint.NET (because it is free) has got me where I am today.  Which, to be honest, is a fair way.  Inkscape and GIMP are really powerful tools, and Paint.NET is much more powerful than it looks at first glance. For me, the niggle has always been that I want to combine vector operations (because I cannot draw the shapes I want freehand), with pixel operations (because I want to hide my horrible lack of vector skills behind big, fat pixels), and I've always found the interfaces and workflow for doing that to be really clunky. This could easily be a lack of knowledge/skill on my part.  If I invested some time in learning how Inkscape and Gimp do these things, maybe I'd find better, easier ways to do them. And that's where my situation has stayed for

The Aeroplane in Action!

Image
It's been a remarkably productive couple of days!  That's not like me at all! Anyhoo, thanks to the glorious Godot Engine , I now have the plane in a scene and a gunsight (made in Inkscape ) moved around by a USB game controller.  Nice! I use the x and y from the controller's analog stick and map that onto viewport space to produce a screen position, using the likes of: cameraNode.get_viewport().get_visible_rect().size.x   Then, I use the camera to project that position into 3D space with var projectVector = cameraNode.project_ray_normal(screenPoint); Finally, I scale that up to the z-distance I want the gunsight at and set that position on the gunsight node!     gunsightNode.translation = projectVector*(100/-projectVector.z); Then, it's just a case of making the plane point at it, and adding a little roll:     playerMeshNode.transform = playerMeshNode.transform.looking_at(                                  gunsightNode.transform.origin, Vector3(

Twin Engine Low Poly Model

Image
This morning I have attempted to model a low-poly WW2-style twin-engine aeroplane.  I wanted it to be somewhere between a DeHavilland Mosquito and a P-38 Lightning.  It turned out more like a mosquito, and there are plenty of tweaks I'd like to do.  However, it is intended for use in an exploration of a 3D flying shooter idea.  Not sure if it'll be bullet-hell or Starwing-esque, but it'll be a thing.  That's the incredibly specific and in-no-way-flawed plan.

Motor Controller from Raspberry Pi

Image
I've finally got off my backside and tested out the N20 motors I ordered what feels like a billion years ago .  Part of the delay was that I lost the original L293D motor controllers I was going to use.  I am just that awesome. It took a little fiddling around, but I got the motor and raspberry pi powered from an ATX PSU and the pi's pins connected via an IDE cable to the L9110S module I got from ebay . Then, I used gpiozero's PWMOutputDevice to create a forward device on one pin and a backward device on the other.  I didn't even have to faff about with the frequencies - just set the value on the object and away it went! So now, my plan is to build the base frame for my CNC router and attach this motor to a threaded rod and rotary encoder.  Fingers crossed that tiny motor has enough torque to move the cutting tray. :S

Mumble on TinyCore

Mumble is beautiful.  It is simple and does exactly what it says on the tin. Something new I discovered about it today is that the static linux release works out-of-the-box on TinyCore ! I got an old thin client off ebay a while back (an IGEL D200 ) and it's so crap it wouldn't even boot with a USB plugged in.  Maybe that's some security BS I haven't found the BIOS switch for, but I gave up on trying to find a way round it. So what I did was set up a VM in VirtualBox which had the right RAM/HDD sizes, then install TinyCore and do the setup. Then, I followed the instructions here (but with VirtualBox not VMware) to clone the VM onto the CF card from the thin client (using CloneZilla ).  I had to use the command line instructions from here to create a raw disk vmdk file for the VM.  I also had to change the permissions on the vmdk file and the block device (/dev/sdd in my case) so I didn't have to run VirtualBox as root. ...but then I slotted the CF c

Early Adventures in Functional Programming

I have been reading about React (so I can eventually learn React Native), and the book starts with a bunch of stuff on functional programming and how it is beautiful. It was quite convincing, so I decided I would give it a try with a code parser I'm writing in javascript (the reasons why are of no consequence :) ). In hindsight, I should definitely have started simpler, but it was still a fun adventure and I learned a lot. I played around with compose() functions which return a function which calls a bunch of other functions in order, and functions which add/remove fields from the data and return it. It was looking fairly descriptive and not too ugly (any ugliness was surely down to my inadequate understanding of functional programming)... ...but then I tried to debug a piece of it. I nearly vomited at the giant stack of bollocks which appeared in the callstack window.  How the hell is that giant stream of nonsense supposed to be helpful? So I'm going back to the

Raspberry Pi Zero W and Servos

Image
For a long while I've had ideas about building a raspberry-pi controlled buggy.  I'd already bought the servos and PWM controller module and they were just sitting in a box labelled 'pi buggy'. Today, I got them out and spent a few happy (and frustrating) hours getting them to work. First up was setting up the PCA9685 servo board.  I didn't even know which pins were what.  I found this document , which came in very handy for that, but I still ended up needing pointers on how to enable i2c on the pi. Then came the joy of setting up the Adafruit libraries.  This should have been a piece of cake, but for some reason the pi wouldn't pick up my home wireless  (Probably because my wifi router is old and pants).  So I had to transfer the library on a USB stick, then install it to find out I was missing dependencies. :( So I ended up downloading Adafruit_Python_... PureIO , GPIO and PCA9685 and installing them ( sudo python3 setup.py install ) in that orde

SHENZHEN IO is eating my brain!

I am loving Shenzen IO at the moment.  I am also incredibly annoyed with Shenzen IO at the moment. It makes me feel like a real electronics engineer in the same way that Guitar Hero makes me feel like I'm a real guitarist.  It's almost certainly nothing like the real thing, and yet... It is SO COMPELLING.  I just want to tweak that circuit, or have a stab at the next puzzle, but each puzzle takes me AGES.  I have never been one to stick at puzzle games before, but the rigid logic of it makes it certain that failure is my fault, not the game author's.  Somehow this makes failure stir even more determination in me and it's near impossible to break away!

Throttle Control Prototype

Image
Today I got my lazy backside away from the computer and made something REAL with REAL materials and REAL tools. I also cut my finger doing it. :( But here is the result of my ham-fisted work!  Behold: a throttle control! I've been thinking about making my own HOTAS setup for literally years - ever since I managed to make a USB steering wheel out of cardboard and prayers. The thing is, I have a Saitek X52 already, but the joystick is just too sticky and jumpy to properly control the UH-1 in DCS World .  So I want to make one which has a wider range of movement and higher sensitivity (thus making it much more precise).  Hopefully my dumb ass might then stand some chance at controlling that damn chopper. Over the years, I've thought up various infeasible ways of magnifying the movement of the joystick, making the potentiometer move through a larger angle.  I even tried to fabricate my own cogs using wooden discs and timing belts (which would probably have worked if

OMFG it works!!!

Image
So I managed to get the edge rotation on a single grid cell to work: And because it wraps all the edge rotations across the grid boundary, it tessellates perfectly! Woop woop!   (...but sorry for the rather large gifs) There is still an issue with the relaxation system 'flipping' triangles over sometimes (one point getting pushed across the opposite edge), but for now I'm going to bask in my success and think about how best to incorporate the ridge-elevation model into this...

More Terrain Experiments

I am still in my long, drawn-out pursuit of a semi-procedural terrain system. My most recent experiments have involved trying to produce a single block of triangles which tessellate.  In this way, I can re-use the triangulation with different elevations for each point (similar to the island terrains I did previously, but INFINITE). I should be able to produce a regular, tessellating block of equilateral triangles, and then apply the edge-rotation and relaxation system.  The beauty of the wrapping would be that one edge of the graph would pull outwards on the opposite edge, keeping everything from collapsing inwards. What I have discovered over the hours I've invested so far is: building a data model for a wrapping triangle graph is chuffing maddening.  I have twisted my brain into so many knots it hurts. I've tried making the edges take account of the wrapping, then the points themselves, then the triangles.  The closest I've got is having a two-layer point system:

Triangle Tree for Terrain

Image
As part of my ongoing experiments into semi-procedural terrains, I decided to have a play with a splitting-triangle tree.  It took me a couple of hours, but I got a simple triangle-splitter working. It's another example of why I love Python for throwing together a quick experiment. The grid is way too regular for my liking, so I guess the next thing would be to get it to split in a non-regular way (whilst making sure that each individual triangle always splits the same each time, so the splitting doesn't change if you leave an area and come back.)

Shadowy Godot Experiment

Image
I have spent all of 2 hours with the Godot Engine , and I LOVE IT. I was reluctant at first, because of all the time I've invested in figuring out Unity and sorting things in that.  So when I wanted to play around with a 2D light/shadow game, I started searching for how to do it in Unity. No immediate answers popped up at me (maybe I didn't know the right key terms), but there were plenty of posts about writing shaders to achieve it.  There were some posts about plugins which only work with Unity Pro (but admittedly, they were quite old).  And a really old post where someone had written their own plugin. This blog post  was particularly interesting as it outlined an algorithm for nice-looking shadows. However, I wasn't looking for how to do beautiful shadows.  I was looking for a way of experimenting with them. So I searched for 2D shadows in Godot.  And I found a very brief chain about the example project showing exactly how to do it. Sure, I had a little both

Island Terrain Generation Part 2

Image
This is a follow-up to a previous post on Island Terrain Generation . I actually had to re-write a lot of the algorithm from scratch, which I'll explain in a bit, but here it is: Instead of triangulating an outline poly, I decided to generate a regular flat triangle mesh, rotate randomly chosen edges, then relax the mesh.  This made the island fully procedural, rather than the semi-procedural generation I wanted.  However, it was necessary to make progress. Once I'd generated the distorted triangle mesh, I could randomly select a point on the mesh to be the peak of the island, and generate ridges/troughs growing out from that peak.  The ridges can split into multiple after a few steps, but they have to stop before they hit the edge of the mesh. Once the ridges are grown, any untouched points can have elevations assigned according to how high their neighbouring points are. I also force all the edge points to have elevation zero. Then, I assign a colour to each tr

Vanity Project: System Emulator

Image
Having played with pico-8 (which I love!), I was wondering about creating an emulated computer system from scratch.  I couldn't really figure out what the point would be.  A demonstration system for secondary students? - probably too complicated.  A competitor to pico-8? - just why? pico-8 is awesome. A replacement for LMC ? - probably too complicated. A nostalgia trip about tinkering with the Commodore 64 back in the day? - maybe. Just for fun? - ... Well I eventually accepted the idea that I am actually crazy enough to enjoy putting together a virtual system for no other reason that it might be interesting to try.  With that in mind, I chose to do it in C# because I hadn't used MonoDevelop in ages.  (Writing a VM which runs inside the .NET VM does feel a little VM-ception though). I decided to start from a 6502-style instruction set, with Load Immediate and such (although I'll probably pass on the more complicated addressing modes), but I thought I'd ma

Island Terrain Generation

Image
I've been playing around with procedural terrain generation for literally years, and the paucity of large-scale successes has made me determined to celebrate small ones.  So, whilst this still needs a HUGE amount of work, here goes... In my recent coding, I've been exploring semi-procedural method for islands using python3.  Building on my python triangulator from the Before Times, I have managed to make this: Yes, it is currently pants. However, it is generated from the outline of the island and the ridge points, and if I apply a DeLaunay pass to the triangulation I am sure it will look a lot better. Also, a great deal of the work has been taken up by figuring out how to store the data in a structure which allows the kind of processing I want to do.  Refactoring this data structure is actually my next step, so I can build to more islandy-looking islands. But the signs are hopeful!

Paper Craft Chimera

Image
A Warhammer 40K club at school has inspired me to get modelling again.  My ragtag scavenger army for battling my brother will now grow to include some militia in the style of the Imperial Guard. I was given some Tempestus Scions for Christmas, and they are works of art.  I'm going to love building and painting them. However, Imperial Guard rely heavily on vehicles and I resent paying huge moneys for ancient models (looking at you, Chimera).  So I started to explore making my own Chimera-like APC. I made very low-poly models of each of the main parts (tracks, hull, turret) in Blender , then marked the seams and used UV Unwrap to make the net.  Exporting that as a .png meant I could print it out. Except...it'd all be the wrong size. So I imported the UV layout .png into Inkscape  and scaled it.  I made a rectangle of a known dimension (e.g. 100mm long for the base of the hull), and scaled the imported png to match.  Then I could print it the correct size! Except...In