Homemade Joystick - Part 3
Final mammoth post about an epic journey...
TLDR: I dun maed a joystick out of wood and Stuff.

I've been planning this for literally years. The tools and materials available to me have expanded over that time. My original plan was to make it out of cardboard using a Stanley knife and PVA. Nobody was convinced that was going to work.
This one is mostly built out of hobbyist plywood and dowels using a scrollsaw, power drill, Stanley knife and scalpel.
I have talked about the base frame in a previous post.
A brief side note: My 3D printer is a relatively cheap setup from ALDI. Software set up was a breeze on a Windows laptop. I chose to print patterns from SD card rather than laptop (laptop hibernate aborted models halfway through). I needed to cleanup prints with a scalpel afterwards, but has worked fine so far with no obvious signs of wear.
How I'd do it differently in future: I'd try to copy the centre part of this mechanism. The semi-circular supports in the middle between the curved arms could make a wooden version solid enough without requiring the stupid amount of space mine took up. I could still do the geared potentiometers, but I could fix them both to the joystick base, making the wiring a lot easier.
Wiring up the stick buttons might be more tricky, but I'll come to that later.
I wouldn't bother trying this again, because the end result is clunky. Four buttons would have been easier and might well have worked better. I think I got close though.


This is made out of short lengths of 6mm hardwood square-section rod. You can clearly see that my measuring and cutting skills suck. However, this base mechanism works pretty well. All the surrounds are glue-gunned down to the prototype board. The microswitches are surface-mount ones and their pins don't poke all the way through the board, so I had to drill holes for wires to poke through. I soldered the wires up to male headers for female Du-Pont connectors to just push on to (spoilers - these connectors didn't go entirely to plan).

Where my contraption really falls down is the hat itself. It's a bamboo skewer glue-gunned into the hole in the central part above, with a small plywood section glued over the top. I went to town with the hot glue with the idea that it would be more grippy on my thumb and therefore more useable.
The main problem though is that even with the grip, you can't just put your thumb on the top and move the hat. If you do that, the shaft tips over and doesn't depress the button. Instead you have to push on the side of the square which makes it a pain to use and causes the whole joystick structure to flex annoyingly.
Lesson learned: 4 buttons next time.
I regret not taking in-progress photos of these.
You can see three layers of plywood. The bottom one is a solid rectangle. The top one simply has the three holes drilled into it for the button dowels. The middle one has the same three holes drilled through it, but also channels cut out from each hole to the top (so the wires from the microswitches can go through).
I soldered wires to three of the same style of microswitches I used in the hat, then glued them upside-down to the bottom of the dowels. This meant the glue and soldered wires would prevent the button dowels from falling out, without me having to create some kind of flange on the buttons.
This was SUCH a pain in the backside. I had decided to use DuPont connectors to avoid having to do a million soldering. DuPont connectors definitely have a knack to them, one which even after significant toil and tantrum I have yet to have confidence with.
My somewhat-working method:
I ended up with a lot of soldering and glue-gunning. Not pretty.

Next time, I would try to put a microcontroller on the shaft itself with only 2 SPI wires and 2 power wires coming out to the base. That should avoid this unholy mess coming out of the axle at the bottom:

The good:
The bad:
TLDR: I dun maed a joystick out of wood and Stuff.

The Abridged Backstory:
I've been planning this for literally years. The tools and materials available to me have expanded over that time. My original plan was to make it out of cardboard using a Stanley knife and PVA. Nobody was convinced that was going to work.
This one is mostly built out of hobbyist plywood and dowels using a scrollsaw, power drill, Stanley knife and scalpel.
The Base Frame:
I have talked about the base frame in a previous post.
A brief side note: My 3D printer is a relatively cheap setup from ALDI. Software set up was a breeze on a Windows laptop. I chose to print patterns from SD card rather than laptop (laptop hibernate aborted models halfway through). I needed to cleanup prints with a scalpel afterwards, but has worked fine so far with no obvious signs of wear.
How I'd do it differently in future: I'd try to copy the centre part of this mechanism. The semi-circular supports in the middle between the curved arms could make a wooden version solid enough without requiring the stupid amount of space mine took up. I could still do the geared potentiometers, but I could fix them both to the joystick base, making the wiring a lot easier.
Wiring up the stick buttons might be more tricky, but I'll come to that later.
Making the POV hat:
I wouldn't bother trying this again, because the end result is clunky. Four buttons would have been easier and might well have worked better. I think I got close though.


This is made out of short lengths of 6mm hardwood square-section rod. You can clearly see that my measuring and cutting skills suck. However, this base mechanism works pretty well. All the surrounds are glue-gunned down to the prototype board. The microswitches are surface-mount ones and their pins don't poke all the way through the board, so I had to drill holes for wires to poke through. I soldered the wires up to male headers for female Du-Pont connectors to just push on to (spoilers - these connectors didn't go entirely to plan).

Where my contraption really falls down is the hat itself. It's a bamboo skewer glue-gunned into the hole in the central part above, with a small plywood section glued over the top. I went to town with the hot glue with the idea that it would be more grippy on my thumb and therefore more useable.
The main problem though is that even with the grip, you can't just put your thumb on the top and move the hat. If you do that, the shaft tips over and doesn't depress the button. Instead you have to push on the side of the square which makes it a pain to use and causes the whole joystick structure to flex annoyingly.
Lesson learned: 4 buttons next time.
The Three Thumb Buttons:
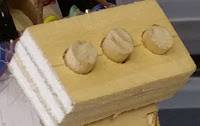
I regret not taking in-progress photos of these.

You can see three layers of plywood. The bottom one is a solid rectangle. The top one simply has the three holes drilled into it for the button dowels. The middle one has the same three holes drilled through it, but also channels cut out from each hole to the top (so the wires from the microswitches can go through).
I soldered wires to three of the same style of microswitches I used in the hat, then glued them upside-down to the bottom of the dowels. This meant the glue and soldered wires would prevent the button dowels from falling out, without me having to create some kind of flange on the buttons.
Wiring up the Stick Buttons:
This was SUCH a pain in the backside. I had decided to use DuPont connectors to avoid having to do a million soldering. DuPont connectors definitely have a knack to them, one which even after significant toil and tantrum I have yet to have confidence with.
My somewhat-working method:
- Keep the strip support on when cutting a connector off the ribbon.
- Position the stripped wire and gently tighten one of the cable-grips to hold it in place while you crimp. (tightening both stops the crimper doing its thing and risks it not sliding into the sleeve nicely later).
- Put the wire & connector as far into the crimper as you can, so the strip support is up against the crimper. If you don't push it in far enough, you'll damage the clip and it'll never click into the sleeve - it'll just keep pulling out again.
- Once you've crimped the first time, cut off the strip support and crimp the damned thing again. Squeeze that crimper really hard. Crimp that damned connector like it killed your cat. (do avoid damaging the bit which holds it in the sleeve later though.)
- Then try inserting the connector into the sleeve. If it gets stuck at all, then take it out and crimp it again like it just threatened to kill your other cat. Keep crimping the damned thing and retrying until it will slide into the sleeve and click without undue force.
- DO NOT try to force the connector into the sleeve - you will only damage it so it won't grip properly later.
I ended up with a lot of soldering and glue-gunning. Not pretty.

Next time, I would try to put a microcontroller on the shaft itself with only 2 SPI wires and 2 power wires coming out to the base. That should avoid this unholy mess coming out of the axle at the bottom:

Evaluation and Conclusion:
The good:
- It works. All the buttons work, the axes work. I can destroy things in DCS World verynicelythankyou.
- It gives good precise control.
- So far it has not fallen apart.
The bad:
- It's slightly annoying that both this and a button/switch box I made come up as 'Arduino Micro' in DCS World. But it's relatively simple to work out which is which: try to assign a combo for one of the Arduino devices - if it doesn't detect the button press you've selected the wrong device!
- Using the POV hat is annoying, but I think I can get used to it.
- Building the wiring for the stick buttons was an ABYSMAL EXPERIENCE.
Comments
Post a Comment