Posts

GW Weapon Masters and Wreckers
Image
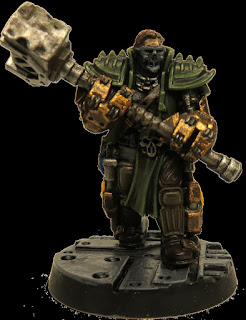
 I just finished the weapons masters from this GW Necromunda set .  I went with a slightly more colourful scheme than the GW artist did, but I still wanted them to look at least somewhat grimy.  With some of the photos I tried to take the white background out (you can see how lame I am at it), but I didn't bother with all of them.  The first one is the hammer guy.  I had trouble figuring out what his mask was meant to look like - I'm not too happy about that.  I am particularly happy with the hammer head - especially how it came out under the light.  I wanted it to look metallic but also dented and dirty.  I think I did a decent job of it.  The arms look much more gold-y in some of the photos and much more bronze-y in others.  The reality is that they are quite a browny-bronze.  I love the sculpt of them, with the believable exposed hinges. The second one is the cylinder-cartridge rifle guy.  I went with Mechrite Red for him, m...
DIY Luggable Pentium

Image
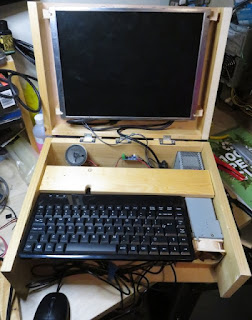
 Ages ago, I bought a Socket 5 Pentium via Ebay.  I had mounted it in a DIY wooden case just so I could use it, but it was always a bit of a pain to fish out a 4:3 monitor, PS/2 keyboard and mouse and connect it all up. So for a long, long while I have had the idea of making it into a 'luggable' machine.  Finally today, I have made it a reality.   I had an ancient monitor kicking around that ran off a 12V input and I had tested powering it from an ATX PSU.  I dismantled it with the idea of using it for video and audio.  Unfortunately while removing it from its case, I managed to damage the cable connection for the speakers, so then I had to dig out an old speaker from a box of scrap. Annoyingly, this motherboard did not have an amplified output - only a line out.  So I bought a cheap amplifier module that works off 5V so I could power it off the PSU's 5V line.  This has led to an annoying amount of noise in the output - I suspect from the PSU. The...

DCS World with TrackIR under Ubuntu

This is a record of my experience of setting this up.  It's meant more as a record for my future self than a tutorial, but maybe somebody will find it useful. 1 - Install DCS First step, install DCS World via the Steam client as normal.  2 - Install LinuxTrack Linuxtrack Download here: https://github.com/uglyDwarf/linuxtrack/wiki/Downloads   Instructions here: https://github.com/uglyDwarf/linuxtrack/wiki/universal-Linuxtrack-package   Using the gui (ltr_gui) requires qt4 libraries, which I could not find in my standard Ubuntu repositories, so I had to use the ppa instructions here: https://ubuntuhandbook.org/index.php/2020/07/install-qt4-ubuntu-20-04 Run ltr_gui from linuxtrack's bin directory to check everything works so far before moving on to get it running under Proton.  3 - Install LinuxTrack into the DCS World prefix NOTE: Attempting to install for Wine games WON'T WORK e.g. here https://github-wiki-see.page/m/uglyDwarf/linuxtrack/wiki/Wine-Games   Th...

Picante: Audio

My plan was always to do a SID-style synthesizer so I could make C64-style sounds on the picante. I've managed to make a thing! This is a software synth running on a RaspberryPi Pico attached to an Adafruit UDA1334 I2S module (recorded through the mic jack on my PC). Getting the UDA1334 working The official Adafruit guide was useful, but not perfect as it didn't cover the Pi Pico.  The micropython examples on how to play a tone and how to play a wav from an sd card were really  useful though. First, I got the play tone working, then I adapted the sd card (non-blocking) interrupt to play a continuous tone (which was just beautiful and didn't make my ears bleed at all). Starting on the Synth I then had to do a LOT of thinking about how I could make this synth fast enough and low-RAM enough for a Pi Pico.  After trying out a few combinations of parameters, I settled on a sampling rate of 16kHz and 16 bits per sample.  I wanted the synth to work on different wavef...

Picante: Transparency and Text

Picante: Basic Graphics Features Complete! The fundamental graphics feature set is there:  clearing the screen drawing 32x32 bitmaps with optional transparent colour index drawing coloured text from bitmap font All features are accessible via python script and clip against the screen edge. It's not yet built to be robust - I was having too much fun to bother writing exhaustive error checking. Whilst the basic design is meant to be fairly speedy without eating too much RAM, there's plenty more that can still be done to optimise it. Blitting: The tiles are processed from a single bitmap, but blitted individually (no fast tilemap feature yet).  It runs at about 15fps, all off a single core.    Text: The text is processed from a png into a 1bpp binary format for the picante engine to load.  This runs at about ~20fps. It's designed to be able to handle any font up to 8x16px, but I've only tested it with the 3x5 tom-thumb font so far.  The small screen really ne...

Picante: Render Buffer Go Bye-Bye

What's gone wrong My initial approach to rendering in a timely manner involved native/C code to 'blit' bitmaps to an 8bpp render buffer.  Every frame, that render buffer is expanded into 16bpp stripes for transfer to the display.  At about 18-19fps, this was pretty tidy. The next step I wanted to take was to render tilemaps to the background, so I found a tileset online and converted into bytes() objects in a .py file for import...and promptly ran out of RAM. The New Proposed Approach So then I started looking at a 4bpp (16 colour) render buffer with colour palette, and I didn't like the amount of pixel operations involved in drawing to it, let alone expanding it out to the stripe for display. So my intention now is to store a list of render commands for each stripe of the display.  These commands could be partial 'blits' of a bitmap, or straight colour-fill, or whatever else.  The key thing is that they are only actually executed once all render commands have b...

Picante: a Pi Pico-based handheld project

Image
In The Beginning... I'd been experimenting with SPI displays on the Micro:bit before now and was lamenting how little RAM they have. So when I read about the Pi Pico 's whopping great 264KB of RAM I immediately wanted to make a DOS-a-like handheld game platform.  It easily has enough RAM for a full 320x240x8bpp frame buffer and at 133MHz it's about the same speed as an original-series Pentium.  Plus, it's dual core! All those figures made me think it would be an absolute doddle to make a DOS-a-like. ...but then I started to think about how it would actually be used.  Sure, I could make it so that C programmers could make games for it, but that might just end up with curiosity value. But what if I could make it so that the students I teach could program games in Python?  That way it would have loads of inspiration power whilst also having high educational value! With the magic mix of both idea and plausible use case, I set about making a prototype. The Hardwa...

EtherDFS and DOS packet drivers

 A good while back, I ordered an ISA network card for my socket-5 Pentium machine.  Finally today I managed to get it working with EtherDFS .  Finding the right steps involved a lot of web searching. First, I had to figure out exactly what model the card was.  Thankfully, it says it right on the chip: RTL8019AS .  I have spewed much bile about Realtek and their crappy audio drivers before now, but I was seriously impressed that they still had a page where I could download the packet driver for this ancient NIC. As far as I can tell, there are two types of NIC drivers for DOS-era machines: an NDIS type for Windows things, and a 'packet' driver with an open interface.  EtherDFS needs the packet drivers, and I don't care for Windows guff, so I'm happy with just that. I found a page at legroom.net which had the info I needed to install the packet driver.  That page has a whole wealth of stuff, but the bit I needed told me to save the packet driver (pnppd....

Adventures in C64 repair

My C64 is still banjaxed, but now in a way that makes me feel it's closer to being fixed. I had thought it was just a dead PSU, so I ordered a new one.  When it arrived, I plugged it in and.....the same problems happened.  So that's the first potential fault ruled out. So I ordered a C64 dead test cartridge .  When this arrived, I plugged it in and powered on...and it gave me all sorts of crap on the display.  Still recognisable characters and border, but utter random garbage.  There was some screen flashing, which is the way the cart indicates dead-ram chips, but it couldn't decide which one - every time I switched the machine on it gave a different number of flashes. The internet had already suggested that garbage text meant a duff multiplexer, and with the cart encountering seemingly random errors across multiple chips, I decided to order a couple of spare multiplexers (there are two in the C64). So today I cautiously desoldered the U13 multiplexer and solde...

C64 Dev with Relaunch64

So moving house has been an absolute pain in the plums.  Monthly projects are on hiatus and until the start-of-term chaos has died down, I'm working on the odd piece of project here and there. The first such project is doing some C64 development, which I've wanted to do for literally years.  I bought an SD-card reader from the future was 8-bit and when it arrived, I dug out  my C64 from storage and powered it on... ...and it was dead. Not fully dead, just...weird.  Blue border and blue background are fine but the screen is filled up with garbage text. So step 1: order a new power supply.  The PSU I was using wasn't a Commodore original, but a replacement from the late 80s.  The problem could still be a b0rked or loose chip, but I got paranoid about using a vintage PSU anyways so I ordered one from Poland.  If that doesn't fix it, I plan to follow some of the procedures here . In the mean-time, I decided to search for an IDE that would run on linux and...

Micro:Bit and SPI display

I want to explore the full potential of the BBC Micro:bits my school has. Making rock-paper-scissors games and the like is all well and good, and the students love it (for the most part), but it always feels a little bit gimmicky.  But when students really get engaged and suggest ideas for them (e.g. games, compass display), it all gets a little bit cramped and feels like it could  kinda  work, but not really . Then I found out that all the tiny strips on the edge are actually GPIO pins, not just the fat 0, 1 and 2 ones.  Since then, I've wanted to explore what I can do with it. Hence, over the last few days I have been trying to get the microbit to control a TFT display. I first went for this 2.4" display with a touchscreen.  The SPI interface is just for the microSD, not for the screen but I didn't think that would be a problem because the micro:bit has so many pins.  After much frustration, I discovered that there are many of the pins you can't reliabl...

Adventures in Wave-Function Collapse 2: DIY Recursion

This post follows on from a previous post about my recent attempts to implement the Wave-Function Collapse algorithm in Godot's GDScript to generate tile map levels. I'm only just posting it now because I didn't realise I'd left it as a 'draft'.  Woe is me. As I mentioned in the previous post, this isn't meant as a set of instructions - more as a reminder for my future self so I don't fall into the same traps again.  That said, hopefully someone else finds it useful as well. Dealing with contradictions When you are trying to generate a grid of tiles using Wave Function Collapse, each cell in the grid can be the top-left corner of one (and only one) super-tile.  As soon as you choose a super-tile for one grid cell, it limits which super-tiles the nearby cells can be.  This is implemented as adjacency rules: essentially there is a set of tiles which is allowed to be to the right of (or left of, or above or below) the chosen super-tile. A contradiction oc...

Adventures in Wave-Function Collapse 1: Super-Tiles

Image
Recently, I have been spending a lot of time trying to implement the Wave Function Collapse algorithm to generate tilemaps.  I think Robert Heaton does a great job of explaining what the algorithm is, but I still needed to figure out a lot when implementing it with tilemaps. This post is the first in a set to document for my future self some of what I learned, so I don't fall into the same traps when I inevitably return to it further down the road. Tiles in bitmap version → super-tiles in tilemap version   An individual tilemap tile is equivalent to a pixel, so super-tiles are collections these tilemap tiles The significance of the size of the super-tiles wasn't clear to me until I tried out different sizes.  The super-tiles I used were square, but in the discussion here I only consider a single dimension to try and make things clearer.  (I also ignore the fact that when the super-tiles are produced, they are usually allowed to wrap from one edge of the template to...
  Last Month's Projects Following my emerging pattern, it is well into April but here's my attempt at a round-up.   Physical make: Tiny OpenWRT -based server.  Nothing material has happened on this one.  I have done some research into the different packages available for OpenWRT (there are loads ).  I'll probably want to switch from mercurial to git if I want to have an internet-visible source-control server without compiling my own package.  The tiny machine might even have enough grunt for a Nextcloud instance, so long as it's a really small number of users. Coding make: I never even started coding for the Dungeon Crawler Jam .  I decided to try and implement Wave Function Collapse in the latest Gotm.io jam so I could get to grips with it.  Turns out WFC is far from trivial if you want a guaranteed solution in a reasonable time.  I spent so much time working on it that I failed to enter for either jam. However, I do have a work...

March Projects

So it's already halfway through March.  A perfect time to review my February projects! Last Month's Projects Physical make: Completed the steering wheel!  I managed to destroy it by accidentally levering the USB connector off the Arduino, but thankfully I had a spare and repaired it (and glue-gunned the damn cable on) and it's going strong! Coding make: I dun it !  ...but I didn't come back to the raytraced helicopter game.  I got sidetracked into looking into making a DOS runtime for the pico-8 subset of lua, and then sidetracked again into making Strike-16 for the gotm game jam. Reading:  The Templars: History and Myth by Michael Haag . So it turns out the Crusades were much more complicated than Christians vs Muslims.  There was plenty of politicking to go around in the Holy Land, and politicking in France eventually did for the Knights Templar.  It was also interesting to learn about the Inner Temple in London, and how St.John's Ambulance cam o...

Strike-16 GOTM Jam Entry

Image
Relatively recently, I was told about gotm.io , a site dedicated to playing Godot engine games in-browser.   I had made a game for a previous jam which I couldn't get to work in-browser on itch, and lo and behold, it worked just fine on gotm.io ! So when I heard the gotm team were running a jam I was really keen to try it out again. The Game Submission It's a tribute to StarWing/StarFox trying to fulfill the theme by having some gameplay based around the boost/brake.  You can play it here (perhaps ironically, I haven't got round to putting it up on gotm.io yet) At the time of writing, voting is still ongoing, so I don't want to criticise it too much.  ;p However, having played some other submissions, my link to the theme is pretty weak.  Never mind - I enjoyed making it. The Making Process I learned a lot making this and if I was to make it again, I would approach it differently, but here's how I went about it. I started by trying to get the look and feel o...

Steering Wheel Finished!

Image
Here it is, immortalised with my atrocious photography skills! It's made mostly out of some old tongue-and-groove flooring samples, with some 4mm and 6mm ply in places.  What with the heavy-duty bearings and being screwed together, it's actually a really robust little thing! I decided to have a composite axle so I could fit the button wires down the centre. So I cut two long, thin beams of ply so they could fit through the very centre of the bearings.  Then I cut small sections out of the edges so that when pushed away from each other, they would lock into the bearings (i.e. not slide through them).  The other blocks you can see are holding the two long pieces apart so they can't fall out. I swapped out the middle block with a spring mechanism.  I cut two bits of ply that I could slide onto the beams from opposite sides.  Then I inserted a section of bamboo skewer between those bits to hook the springs onto.  As you can see, I used screws to secure the othe...