Posts

2-Button Jam: Postmortem

Image
What? I participated in my first itch game jam and it was great fun.  I thought I'd write a postmortem for posterity and in case anybody might find it useful. The jam The game Art apps used: GIMP , Pinta , Tiled Sound apps used: Beepbox , Audacity Engine used: Godot How I came to the game jam I used to work as a game programmer and I've always harboured my dream of making my own games.  I'd been to my local game developer meetup , and we'd discussed itch game jams as a motivational tool.  When the Easter holidays came around (I'm a full-time teacher), I decided I would take the plunge.  I chose the 8-bits-to-infinity jam because the constraint of only using two buttons intrigued me. Initial ideas for the game With such a strong limitation as only having two buttons, I decided to start with the mechanics.  Having played Micro-Machines on the PSX back in the day, I remembered playing 4-player with only two controllers.  Each player had hal...

GRG16: Update

Progress on the GRG16! I decided the next project waypoint for me was going to be an emulator which loads a boot/BIOS rom which will display a 'No cart inserted' message on screen.  This seemed like a good target because it would mean integrating some kind of programming, defining graphics data and enough of the emulator machine itself to display it. So far, progress has been slow but steady.  I have implemented a rudimentary assembler in Python which can also include raw hex.  The current version can parse/assemble asm code and also extract pixels and/or palettes from images (using the Pillow Python library).  I'm sure there are plenty of bugs still to find in it, but the file it produces passes the quick-scan-in-a-hex-editor test. I've also made some progress on the emulator side.  In addition to the VPD I worked on previously, the CPU is pretty much implemented, and I've just implemented a BusController to move data between boot/BIOS rom, cartridge, RAM...

GRG16: Mega-Drive-a-like

I was musing about the possibility of getting students to write console homebrew software.  I suspect students would find the prospect of running their own games on emulators (or perhaps even an actual software-hacked console) really inspiring and enjoyable. However, the technological difference between making homebrew software and downloading and running copyrighted ROMs is incredibly small.  So I suspect students' parents might be a bit suspicious or potentially even outright hostile to such a club. So I started to dig down to what the educational benefit of such a thing would be.  Potental benefits might include: understanding/using indexed-colour images, managing RAM and VRAM by hand, writing programs in assembler (or a subset of C), understanding specific technical limitations.  In short: lots of great scope for computational thinking and exposing technical systems as not-actually-magic. Pico-8 is amazing and YOU SHOULD BUY IT.  I love it and it is v...

Cardboard Mock-up of USB Joystick

Image
For years now (literally years ), I have been playing around with the idea of making a USB joystick.  You may have seen my previous experiment in building a throttle control . I wanted to use a similar idea to the throttle, taking the angular motion of the handle and magnify it when applying it to the potentiometer.  e.g. move the handle through 45 degrees and the potentiometer gets moved through 90 degrees. I also wanted it anchored at the rear, so I can build a mount to attach it to my computer chair. In the video you can see a cardboard mock-up I made today.  I'm amazed it worked at all, but it even provides a solid foundation for designing the proper plywood one. The process of making a cardboard mock-up was really useful.  There were three fatal flaws in my sketch design which I would not have found out until I tried to make it: Pushing the joystick left/right when it was already pulled full back makes it catch on the rear support. The internal ...

Scratch Built Chimera-a-like

Image
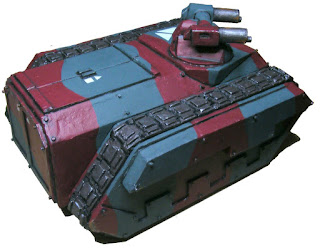
I've been working for a billion years on building a 40K-Chimera-style APC.  It's meant for my own pet Imperial Guard regiment styled around salvaged and cannibalised equipment.  (Gods bless the flexibility of the Rogue-Trader-88 rules!) After much swearing and bleeding over plasticard, I managed to cobble together a shell and cover most of the flaws with Milliput.  And then the model sat, ready to be painted, for many weeks.  But this weekend, I finally got around to painting it! What's that?  You want to see shoddily-edited photos taken by a monkey with no appreciation for lighting?  I have just the thing! The true colours are somewhere between the top two pictures.  The photos also don't show quite how wonky the whole thing is.  I doubt there's a pair of parallel edges anywhere on it. For the rust I followed this tutorial .  For the rivets, I cut discs from some really thin plastic rod (thank you dakkadakka forums for th...

SVG to Animated Sprite Experiment

Image
This is more of a record for myself rather than a usual blog post, but I've been working hard to develop an art pipeline where I can avoid having to draw a gazillion sprite frames without going full shadow-puppet like Spriter . Today's result is rubbish: ...but y'know, it's more of a proof-of-concept than an actual art attempt. The idea is simple:   Draw a simple SVG image with multiple components Import into Blender, assemble components and animate Render animation from Blender into sprite page ready for 2D game. Of course, the implementation is far from simple. First off, Blender imports the SVG outlines as curves, not meshes.  So in object mode , you have to select the curve, press Alt-C , then select Mesh from Curve/Meta/Surf/Text . That makes the outline into a bunch of lines.  In edit mode , select all the vertices and press F to make it a face.  Then, optionally Triangulate Mesh . Position, scale, rotate the components as requi...

Mechanical November '18 : Power Turbine Part 1

Image
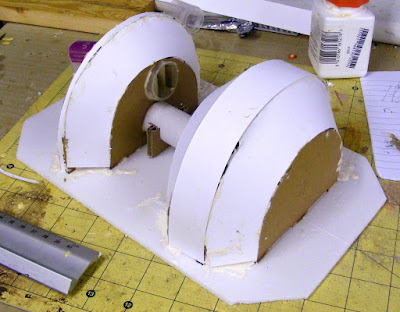
Over at Azazel's Bitz Box the November challenge is 'Mechanical' miniatures and scenery. I've been meaning to make some more 40K scenery for a while, and I've never taken part in a challenge like this before.  So today I spent a pleasant few hours working on a large power-turbine piece. So far it looks like this: It's quite messy, but the the core of it is there. The left end is meant to be a turbine driven by high pressure gas coming out from underground.  The idea is that this would drive a shaft in the central tube, which in turn drives the generator end (the right hand side). The plan is for it to have some access hatches, cooling radiators, rivets, and a couple of control consoles.  There's a lot of filling/tidying that's needed before then, but it's getting there. Here's some detail of the inflow pipe and exhaust vents. Yes, that is a (never used!) medical specimen tube. ...and the internal cardboard structure ...